
How to Sublimate Tumbler

Sublimation tumblers are one of the hottest projects among crafters and small businesses today. They are vibrant in color, durable, and fully customizable. Whether you're looking to create personalized gifts, branded merchandise, or a custom tumbler for yourself, learning how to make sublimation tumblers is actually quite simple as long as you have the right tools and follow the proper steps.
In this guide, you'll learn the entire sublimation tumbler process. First, we'll introduce the tolls you'll need, then discuss the pros and cons of two sublimation devices, and finally cover solutions to common problems. This will help you create perfect, professional-quality tumblers every time.
Let's get started!
What is a Sublimation Tumbler?
Sublimation tumblers are created by using high heat to allow sublimation ink to penetrate the polymer coating of the tumbler. Unlike engraving or stickers, the sublimation design fully integrates into the tumbler's coating, making it resistant to peeling, fading, or cracking. The design remains unaffected by daily use or washing.
This process is suitable for stainless steel or glass tumblers with a special coating and can be used to print designs, photos, logos, and other custom artwork.

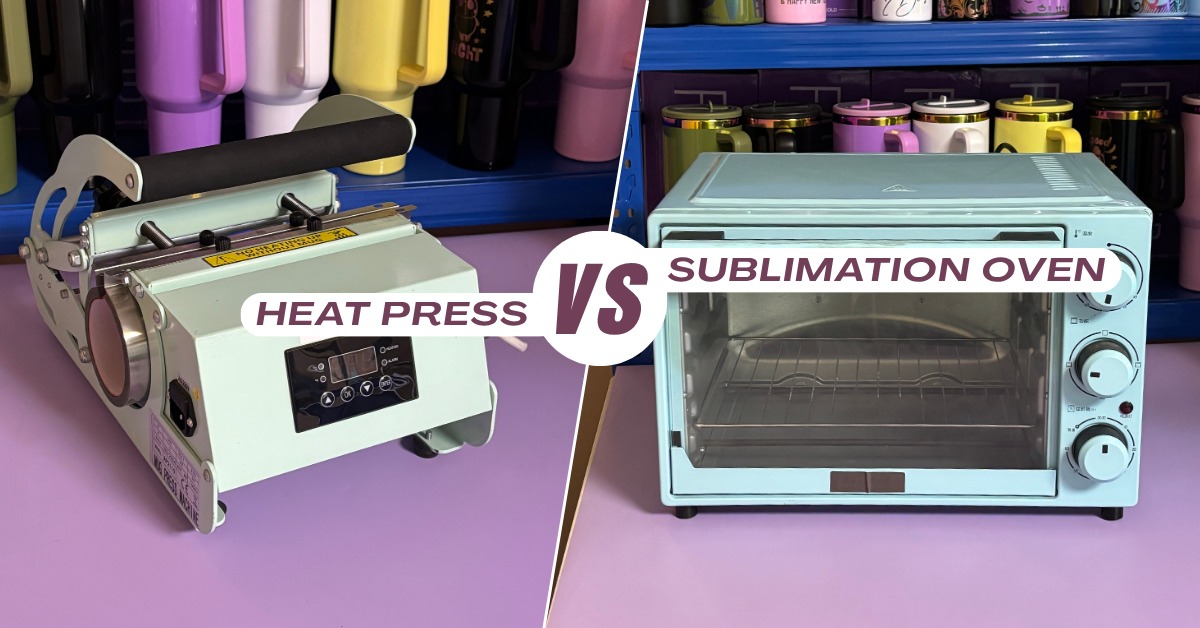
Which to Choose for Sublimation Tumblers: Heat Press or Sublimation Oven?
There are two main types of heating equipment used for making sublimation tumblers: heat press machines and sublimation ovens.
These two devices differ significantly in terms of usage scenarios, ease of operation, and results, each with its own advantages.
Let’s explore the pros and cons of both, so you can choose the one that best suits your needs.
Pros and Cons of Heat Press
A heat press is a machine specifically designed for customizing tumblers. It typically transfers sublimation designs evenly onto the surface of an item by clamping it in place and applying heat.
Some pros of heat press:
- Provides even heat and pressure distribution.
- High transfer efficiency, with each heating cycle taking only 30-60 seconds.
- No need for additional tools like heat guns or shrink wrap.
- Compact size, saving space in your workspace.
Some cons of heat press:
- Suitable for standard-shaped tumblers, may not be ideal for custom or irregularly shaped tumblers.
- Can only male one sublimation tumbler at a time.
Pros and Cons of Sublimation Oven
A sublimation oven is a more versatile device, suitable for various items, including irregularly shaped tumblers, T-shirts, hats, and more. Its heating method typically involves heating the item from both the top and bottom.
Some pros of sublimation oven:
- Suitable for sublimation on a variety of items.
- Can heat multiple tumblers at once.
- Ideal for large capacity tumblers and irregularly shaped tumblers.
Some cons of sublimation oven:
- Prone to uneven heating.
- Requires additional tools like a heat gun and shrink wrap.
- Longer heating time.
Which Device to Choose for Sublimation
If you need to quickly customize standard-sized tumblers, such as 20-oz or 30-oz, a heat press machine can help you achieve fast, efficient, and easy customization. For larger tumblers like 40-oz, or for cups with larger diameters or handles, a sublimation oven is more suitable as it better accommodates diverse product needs.
With proper use, both heat press machines and sublimation ovens can create beautiful designs on tumblers. The choice of device depends on your specific needs, personal preferences, and budget.
Now that you understand the equipment for sublimation printing, let's dive into the tools you'll need to create stunning custom designs.
Tools Needed to Make Sublimation Tumblers
Before starting the sublimation process, you’ll need the following supplies and equipment:
- Sublimation-Specific Tumblers: Choose high-quality tumblers with a polymer coating on the surface, as this is essential for achieving a perfect sublimation result.
- Sublimation Printer and Ink: Use a specialized sublimation printer and sublimation ink; regular ink like not work for sublimation.
- Sublimation Transfer Paper:Select high-quality transfer paper to help you achieve vibrant, sharp designs.
- Sublimation Machine: There are two options-heat press and sublimation oven.
- Lint-Free Microfiber Cloth and Alcohol:Use a lint-free microfiber cloth and 75% medical alcohol to clean the surface of the tumbler.
- High-Temperature Tape:To secure the transfer paper in place and prevent design shifting, without leaving any adhesive residue.
- Heat-Resistant Gloves: After sublimating, heat-resistant gloves will help you safely remove the tumbler.
- Heat Gun and Shrink Wrap (Optional) : When using a sublimation oven, you need to wrap the tumbler with shrink wrap to ensure even pressure.

Step-by-Step Process for Sublimating Tumblers
To achieve vibrant, even prints, follow these steps:
Step 1: Design and print the Pattern
- Measure the circumference and height of the tumbler in advance, and create a canvas with the corresponding dimensions in your design software.
- Set the resolution to 300 DPI to avoid blurry prints after printing.
- For full-wrap design, leave a 1-2 mm overlap to avoid a bank spot at the seam of the tumbler.
- Most important, flip your design horizontally, if your forget to flip it, the final design will be reversed.
Step 2: Clean the Tumbler Surface
- Use a lint-free microfiber cloth soaked in 75% alcohol to wipe the surface of the tumbler, removing dust, oil, fingerprints, and other impurities to ensure the sublimation process is not affected.
- Place the cleaned tumbler in a dry ares and let it air dry naturally. Do not use paper towels to dry it.
Step 3: Wrap and Secure the Sublimation Paper
- Place the prepared sublimation paper tightly against the tumbler, ensuring the design is centered both vertically and horizontally, with the seams aligned properly.
- Take heat-resistant tape and apply it along the vertical edges of the sublimation paper, securing 2-3 strips evenly from top to bottom. Make sure the tape is pressed down firmly to prevent any loosening.
- Slowly press the sublimation paper from one side to the other with your palm, squeezing out the air between the tumbler and the paper. Ensure the paper adheres completely to the tumbler, with no bubbles, wrinkles, or looseness.
Step 4: Perform Sublimation
If you are using a heat press machine, follow these steps:
- Set the heat press machine temperature to 350-380°F and wait for the machine to reach and stabilize at the preset temperature. Different blank tumblers may have slightly different parameters, so it's best to refer to the manufacturer's recommended temperature for the blank cups.
- Carefully place the wrapped tumbler into the heat press and apply pressure for 30-45 seconds. Rotate the tumbler 180 degrees to ensure even ink transfer, then continue pressing for another 30-45 seconds.
- When the timer finishes, wear heat-resistant gloves to open the heat press and carefully remove the sublimated tumbler to avoid burns
If you are using a sublimation oven, follow these steps:
- Set the oven temperature to 350-380°F and preheat it to ensure the internal temperature is uniform. Always follow the manufacturer's instructions for time and temperature.
- Wrap the tumbler, which is covered with sublimation paper, with shrink wrap. Use a heat gun to shrink the wrap by holding it 4-5 cm away from the shrink film.
- Place the tumbler in the center of the oven rack and set the baking time for 5-6 minutes. After 2-3 minutes, wear heat-resistant gloves to rotate the tumbler 180° and continue baking until the time is up. This baking time is a reference and may vary depending on the size of the tumbler.
- Once the baking is finished, immediately open the oven and carefully remove the tumbler using heat-resistant gloves.
Step 5: Cooling
- Place the freshly transferred tumbler on a heat-resistant mat and let it cool naturally.
- Wait until the tumbler is completely cool, then peel off the heat-resistant tape and slowly remove the sublimation paper.
Common Problems and Solutions for Sublimation Tumblers
- Faded or Light Colors: Increase the temperature, apply more pressure, or extend the time to fully transfer the ink. Also, ensure that the ink used is specifically designed for sublimation.
- Wrinkles in the design: When applying the sublimation paper, make sure to smooth out any bubbles and avoid wrapping it too loosely.
-
Stripes or Spots in the Design: The tumbler surface may be contaminated, preventing the ink from adhering properly. Clean the tumbler thoroughly and avoid touching it with your hands after cleaning.
-
Blurry Design: Reduce the printing time. Too long of a printing time can cause the ink to spread.
- Paper Sticking to the Tumbler: This could be caused by excessive temperature or poor quality coating on the tumbler. Lower the temperature or choose a tumbler with a high-quality coating.

Sublimation Tumbler FAQs
Can all tumblers be sublimated?
Not all tumblers are suitable for sublimation customization. Only tumblers with a special coating on the surface are compatible with sublimation. When purchasing sublimation blanks, make sure they are sublimatable tumblers.
What are the best sublimation tumblers to buy?
The 20 oz Sublimation Skinny Tumbler is one of the best models to purchase, as its straight cylindrical design makes sublimation easier. You can check out the Fastsub brand, which wholesales a variety of sublimation tumblers in different sizes and models, including the 20 oz Sublimation Skinny Tumbler. These tumblers are made from high-quality 304 stainless steel, ensuring they are safe and odor-free.
Do sublimation tumblers fade?
Under normal use and cleaning conditions, sublimation tumblers are resistant to fading. However, prolonged exposure to direct sunlight may cause the printed design to fade.
Choose the Right Thermos for You Right Now
Overall, as long as you carefully follow each step and use the correct materials and tools, you can achieve vibrant, durable, and fade-resistant sublimation results. Once you become proficient, creating custom sublimation tumblers will become quick and efficient, whether for DIY projects or bulk production for your shop.
If you're a beginner in sublimation or looking to start a custom sublimation tumbler business, you can also check out the "Sublimation Tumbler Guide for Beginners" , which will give you a more comprehensive understanding of sublimation and guide you in starting your sublimation tumbler business.
If you plan to launch a tumbler business, the quality of the blank tumblers is extremely important. FASTSUB offers a wide range of high-quality sublimation tumblers in various sizes and specifications, from 16-oz to 40-oz, including stainless steel, glass, and acrylic cups, to help boost your craft business.
Leave a comment
This site is protected by hCaptcha and the hCaptcha Privacy Policy and Terms of Service apply.